holiday project #2 - this time it's a pottery barn inspiration
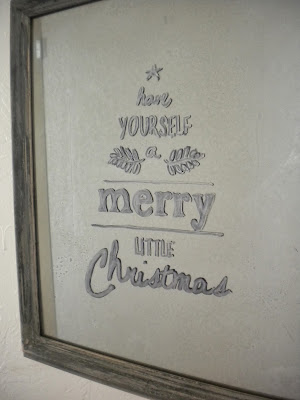
My little holiday craft project this past weekend was once again a copycat... a popular copycat since I have seen it on other blogs and Pinterest as well. It's my take on the Pottery Barn vintage looking holiday mirror.
This one was on Pottery Barn, and not for just a few dollars, as you can imagine.
 |
| via Pottery Barn |
For my version, I started with two thrift store pictures... The smaller gold framed one was just $1.99 and the larger one was $6.49. Since our local craft stores haven't sold the needed Looking Glass spray paint by Krylon I resorted to Amazon. This little spray can isn't cheap ($8.99 a can) but from past experience I knew I could get a number of mirrors out of one can.
My next supplies, and steps, were a print out of the Pottery Barn picture and a couple of Sharpie markers, which I already had. I removed the glass from my frames and just traced over my copied (and enlarged) image. Since I wasn't sure how the gray/silver marker would show against the finished mercury glass like background, I used a combination of the gray and black. I thought it looked more rustic this way as well.
The larger frame needed a paint job too. I decided to go with a sort of faux zinc look and broke out my stock of Annie Sloan Chalk Paint sample jars.

First I used a solid coat of Paris Grey.
Then brushed on a spotty coat... almost dry brushed in fact, of Graphite.
Once my lettering was complete I took my glass, spray paint and water in a spray bottle outside to work on the mercury/old glass mirror part of the project. I used the same steps as I did when I made these mirrors for myself. Other blogs and Pinterest projects use different methods for the vintage glass part. Some even take real mirror and distress them with acid... I like this technique since it's pretty easy and I don't need to wear rubber gloves!
You can see in these up close photos that the mirror has an aged look to it... it's harder to see in the full shots of the piece.
I'm pretty happy how this one turned out. It's about 11 by 14 or so in size and will be a gift for a family member.
The smaller gold one? Well it turned out a bit of a fail... I didn't realize the "glass" was plastic and when I tried my Looking Glass spray paint on it, well, it just turned out a frosted gray! Since this one is just a standard 8 x 10 I'll pick up a super cheap frame at the thrift store and use that glass in this frame since I want the gold and silver look... since this one was just $1.99 an extra $.49 or $.99 for another cheapo frame won't break the budget! And it will give me time to work on my gold/silver marker layering technique as well... because I'm not overly happy with it either... or maybe it's the image I chose. Hmmmm.
Not too bad for two gifts. I barely used any of my first can of paint... even if I have to pay $2.50 for another frame I'll still be under $20 for two gifts!
Now on to the next project,
linking up to
AND
AND


I'm really impressed with the projects you're turning out!!!! Really cute!
ReplyDeleteLove your copycat, Chris! I've been copying PB's "It's the Most Wonderful Time of the Year" sign myself, but the mirror art is on my list!
ReplyDeleteoh wow that is fantastic!
ReplyDeleteI LOVE it!
ReplyDeleteSo cool! And what a wonderful gift idea! I really want to give this a try. I've never been able to find that spray locally either. I was afraid I'd need a few cans, but glad t hear a little goes a long way. Love seeing all your holiday projects, keep them coming!
ReplyDeleteLove it! Totally going to steal it! (the idea that is, not the ones you did)
ReplyDeleteThanks for the tips!