full of beans
Yesterday was a quiet day here at Red Gate Farm. It seems that Mr. Red Gate Farm, my husband, has been doing just a bit too much and wasn't feeling well. It takes a lot to make this guy take to bed... or the chair with blanket... in the middle of the day... when he did I knew he really wasn't feeling well. So my day started with an early morning trip to the store to stock up on lots of liquids and some cold/flu medicine. I tried to keep the noise in the house to the minimum but with 4 dogs (my daughter's dog was here for the week plus our three) it was a bit of a madhouse at times!
Needless to say... I didn't get the bathroom painted. But I did get another little project done. A quiet project that is. Something with no noisy ladder climbing and clanking or sewing machine sewing....
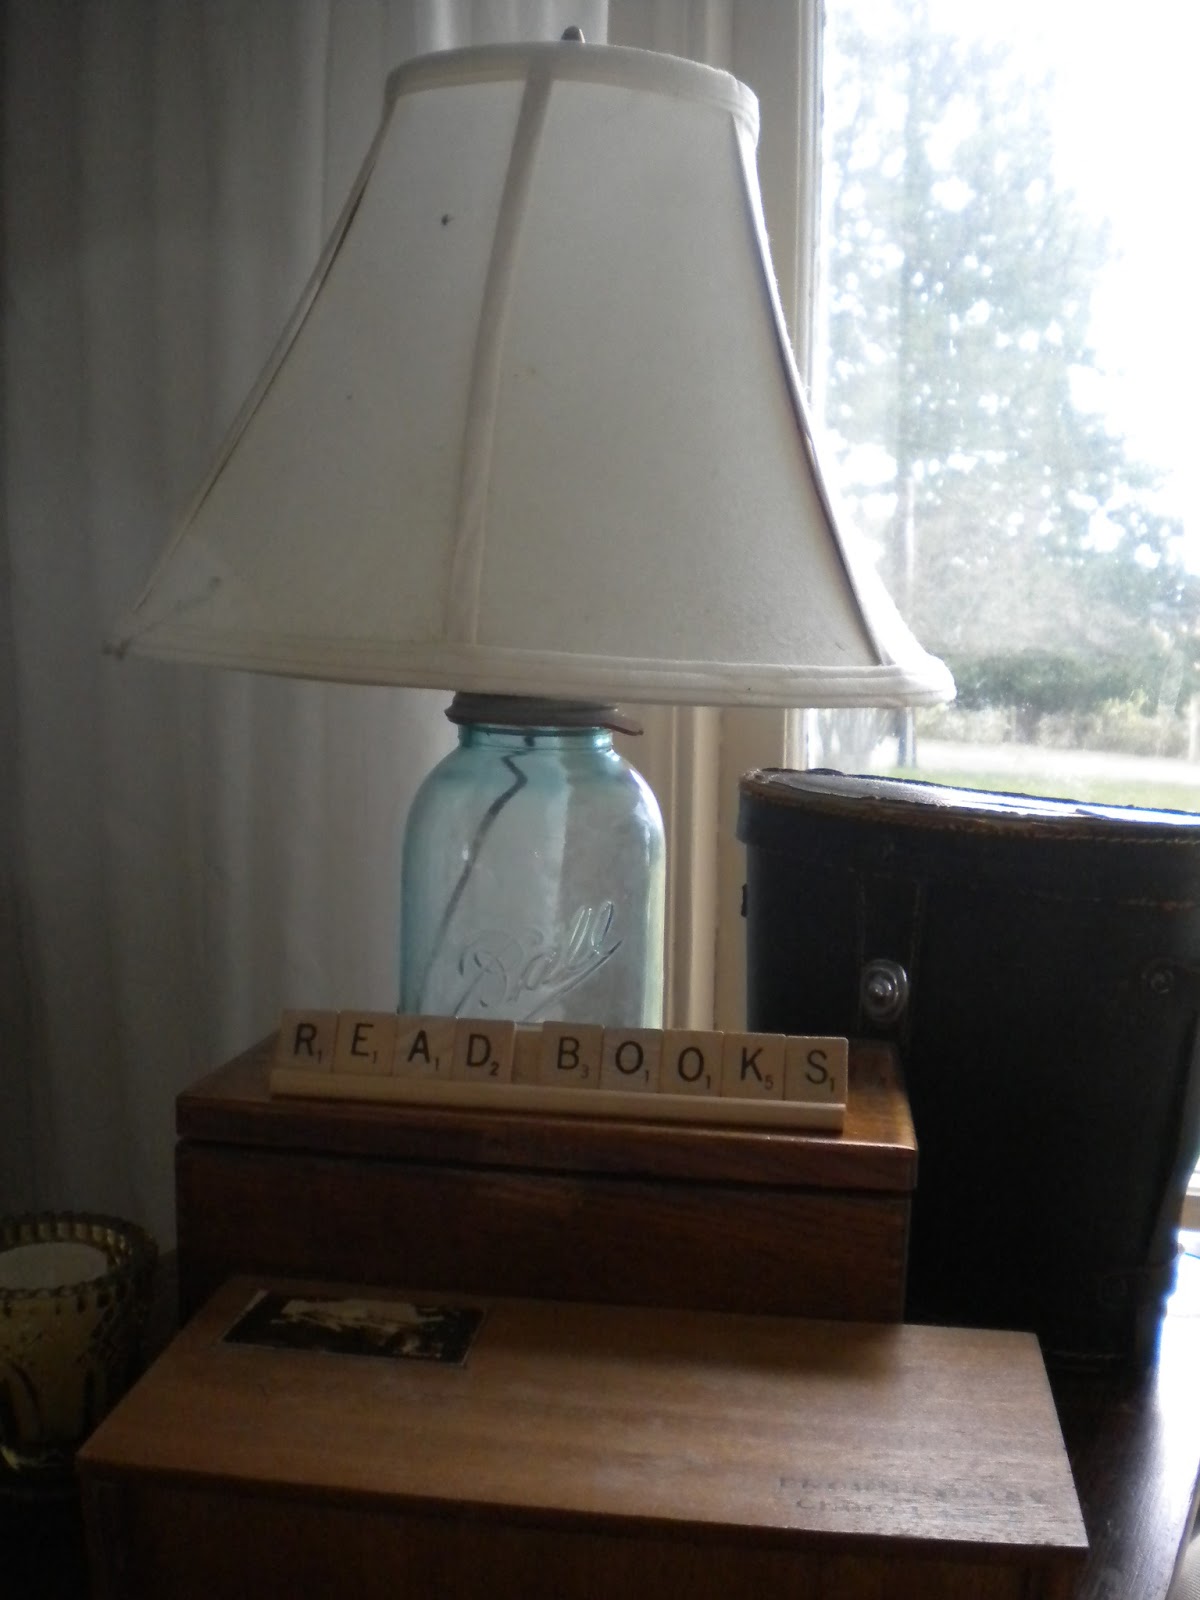
So this project? Last summer I came across a lamp at the thrift store. It was a large aqua blue antique canning jar with a screw on lamp attachment. The shade was a stenciled country motif and the jar? Well it was full of beans, of course. The whole thing, beans included, was just $6.99. Since those aqua jars go for a pretty penny at the antique store and the lamp kit thingy was a nice solid one with a finial, harp and everything... well I thought it was a pretty good deal. I brought it home and had a spot all picked out in the living room... without the beans and without the stenciled shade that is. The only shade I had lying around wasn't the best option but better than nothing while I found something new. Fast forward a few months and I was still looking....
Then the other day while pulling into my garage, I realized that I had 3 lamp shades sitting in my garage from my daughter and son-in-law... they were waiting for a trip to the thrift store of their own. I've seen some fabulous ideas for shades on Pinterest and well... I guess you could say the light bulb finally went off! This was the one I liked the most and decided to try to copy....

I've had a yard of a nice weight linen that I purchased with a wedding project in mind... and didn't use... so with fabric, two different sized shades and scissors I was in business!

First up was choosing which shade to use... this one seemed too small.

This one a little too big.... hmmm. I decided to go with the bigger one first. Since I wasn't planning on gluing, just tying, the fabric I could always start over.

The first step was removing the fabric from the actual shade frame.

Hmmm... I didn't expect the top ring to not be attached to the side supports.

And I need the top ring for attaching to the lamp properly.... what's a girl to do?

Well I dug out some twist ties from my drawer and attached the ring in three spots, of course! Not too pretty but they were white and the only wire I could find was green.

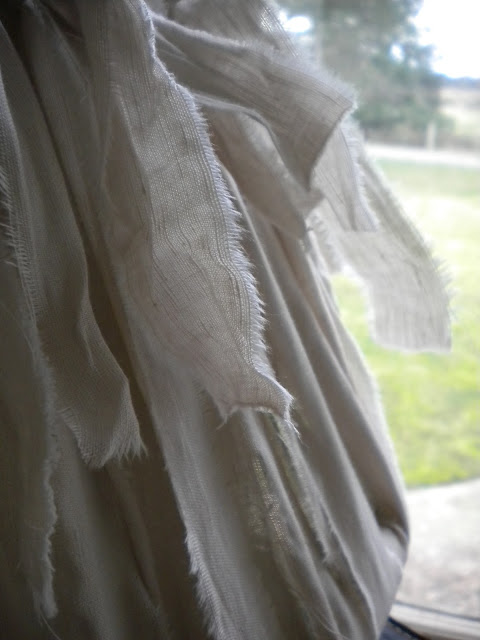
Next step was ripping, yes ripping, some strips of fabric. I ripped the 48 inch wide linen from selvage to selvage and each strip was about 1 inch wide. I didn't measure, just eyeballed it.

Then using one piece at a time, I started attaching them to the frame and finishing each strip by tying the two ends of the same strip together.

I kept the knots about the same distance from the top, but once again just eyeballed it. My inspiration picture had the knots closer to the bottom but I didn't want to emphasize the larger frame and decided to keep my knots towards the top of the frame instead.

I would start each stripe on the top ring with a bit hanging down...

Bringing the strip down and over the lower ring...

Then wrapping the strip around the ring...

Before bringing it back up to wrap around the top ring...

Then back down around the bottom and I would pull the end through the last two pieces and back up to tie it off securely with the tail I started with. Each strip created three full "lines" with the fourth being overlapped and tied.

Once I did a couple of strips I came up with the way I wanted to do it and just kept going around the frame. Of course the top ring is smaller and I had to overlap a little more to keep everything even. The shade took exactly 19 of my strips and used just over 1/2 yard of fabric... so my 1 inch eyeball method was pretty good.
I think the hardest part of the project was pulling all the loose strings off of each strip after I tore them! I had quite a pile.

I was happy with the results too.

And didn't think the larger shade ended up looking too big. Perhaps the shape now being different made it look more in scale with the jar lamp. I may trim the tails up a bit more but haven't decided yet....

It was a quick project that took about 45 minutes from start to finish...

And was a quiet one too... which was important so that the Mr. could get some well needed sleep.

And the dogs could too!

Looking forward to a short week of work,


Needless to say... I didn't get the bathroom painted. But I did get another little project done. A quiet project that is. Something with no noisy ladder climbing and clanking or sewing machine sewing....
So this project? Last summer I came across a lamp at the thrift store. It was a large aqua blue antique canning jar with a screw on lamp attachment. The shade was a stenciled country motif and the jar? Well it was full of beans, of course. The whole thing, beans included, was just $6.99. Since those aqua jars go for a pretty penny at the antique store and the lamp kit thingy was a nice solid one with a finial, harp and everything... well I thought it was a pretty good deal. I brought it home and had a spot all picked out in the living room... without the beans and without the stenciled shade that is. The only shade I had lying around wasn't the best option but better than nothing while I found something new. Fast forward a few months and I was still looking....
Then the other day while pulling into my garage, I realized that I had 3 lamp shades sitting in my garage from my daughter and son-in-law... they were waiting for a trip to the thrift store of their own. I've seen some fabulous ideas for shades on Pinterest and well... I guess you could say the light bulb finally went off! This was the one I liked the most and decided to try to copy....
I've had a yard of a nice weight linen that I purchased with a wedding project in mind... and didn't use... so with fabric, two different sized shades and scissors I was in business!

First up was choosing which shade to use... this one seemed too small.

This one a little too big.... hmmm. I decided to go with the bigger one first. Since I wasn't planning on gluing, just tying, the fabric I could always start over.
The first step was removing the fabric from the actual shade frame.

Hmmm... I didn't expect the top ring to not be attached to the side supports.

And I need the top ring for attaching to the lamp properly.... what's a girl to do?

Well I dug out some twist ties from my drawer and attached the ring in three spots, of course! Not too pretty but they were white and the only wire I could find was green.

Next step was ripping, yes ripping, some strips of fabric. I ripped the 48 inch wide linen from selvage to selvage and each strip was about 1 inch wide. I didn't measure, just eyeballed it.

Then using one piece at a time, I started attaching them to the frame and finishing each strip by tying the two ends of the same strip together.

I kept the knots about the same distance from the top, but once again just eyeballed it. My inspiration picture had the knots closer to the bottom but I didn't want to emphasize the larger frame and decided to keep my knots towards the top of the frame instead.


Bringing the strip down and over the lower ring...

Then wrapping the strip around the ring...

Before bringing it back up to wrap around the top ring...

Then back down around the bottom and I would pull the end through the last two pieces and back up to tie it off securely with the tail I started with. Each strip created three full "lines" with the fourth being overlapped and tied.

Once I did a couple of strips I came up with the way I wanted to do it and just kept going around the frame. Of course the top ring is smaller and I had to overlap a little more to keep everything even. The shade took exactly 19 of my strips and used just over 1/2 yard of fabric... so my 1 inch eyeball method was pretty good.
I think the hardest part of the project was pulling all the loose strings off of each strip after I tore them! I had quite a pile.


It was a quick project that took about 45 minutes from start to finish...


Linking up to
and


Chris,
ReplyDeleteThanks for sharing this charming DIY lampshade at my party!!! Hope the hubs starts feeling better.
Blessings,
Linda
Hi Chris. Hope your husband is feeling better and that you stay well.
ReplyDeleteThe lampshade looks great. I have done a couple similar to yours and I really do like them. Easy, unique, and cheap.
Sorry to hear about your hubby. Sickness has hit my son (and his girlfriend, go figure!), but so far, none of the rest of us.
ReplyDeleteI love what you did with the lamp. The knots and their placement look really great and whimsical!
Wedding plans are going full speed again. Just secured the photographer and possible found a caterer.
I'm embarrassed to say this, but do you still have a copy of the email you sent me? I put it into a file and now it's gone. Should have just left it in my email. no worries if you don't, as I remember most of it, just didn't want to forget anything as it was so helpful.
Stay healthy...lots of airborne and vitamin C!
What a charming idea! Thanks for taking the time to show us. You have a lovely blog.
ReplyDeleteHi Chris - I saw your lampshade at E&C's party & had to come over to take a look as I have 3 shades I've been wanting to do something similar with. This is perfect! So nice to find another Washingtonian blogger as well :) Blessings, Patti@OldThingsNew
ReplyDeleteSo lovely! I have a shade I am thinking about doing something similar to.
ReplyDeleteVery cute idea, I love it!!! You did a great job on your shade. I have
ReplyDeleteto two bedroom shades that are going to get this makeover!!!
Hugs,
Chris :o)
Very nice! The fabric started out looking like my 'rag' curlers (dating myself, here) that my mother would use on my hair when I was a little girl, but turned out quite soft and frilly in the end! xo
ReplyDeleteJust fabulous!! Love the lampshade redo, and that blue canning jar is gorgeous!!
ReplyDeleteOh, I absolutely love it Chris!! So pretty, and I adore the mason jar! So creative! xo Heather
ReplyDeleteI love how this turned out! I've been thinking about redoing some lampshades, too, so maybe this will be the kick in the pants I need!
ReplyDeleteOh, I love that! I've got several canning jar lamps... I'll have to try your shade idea...
ReplyDeleteREALLY cute. I love that so much. May steal the idea...Thanks!
ReplyDeleteLove it!!! You did so great!! Hope your hubby is better by now, and that no one else is sick. Stay well! -Tammy
ReplyDelete